PyTorch 모델 구조 summary & 그래프화 2
728x90
반응형
이전 글: [AI/Self-Study] - PyTorch 모델 구조 summary & 그래프화 1
PyTorch 모델 구조 summary & 그래프화 1
TensorFlow에서는 model.summary() 메서드 호출을 통해 모델을 요약해서 layer마다 shape와 같은 정보들을 볼 수 있다. PyTorch에서 model.summary() 처럼 사용할 수 있는 메서드와 모델 구조를 그래프화 하는 방..
lynnshin.tistory.com
저번 글에 이어서 PyTorch 모델 시각화 방법에 대해 알아보자
2. 모델 시각화 확인
2-1) Torchviz
!pip install torchviz

from torchviz import make_dot
import torch

x = torch.zeros(1,1,28,28) # dummy input
make_dot(cnn(x), params=dict(list(cnn.named_parameters())))
PyTorch의 Autograd는 수식에서 미분을 자동으로 해 주는 기능
show_attrs=True & show_saved=True 옵션을 줘서 자동 미분이 저장하는 값 확인
# Set show_attrs=True and show_saved=True to see what autograd saves for the backward pass.
make_dot(cnn(x), params=dict(list(cnn.named_parameters())), show_attrs=True, show_saved=True)
그래프를 .png 파일로 저장할 수 있다.
make_dot(cnn(x), params=dict(list(cnn.named_parameters()))).render("cnn_torchviz", format="png")
make_dot(cnn(x), params=dict(list(cnn.named_parameters())), show_attrs=True, show_saved=True).render("cnn_torchviz2", format="png")
2-2) HiddenLayer
!pip install hiddenlayer

import hiddenlayer as hl

transforms = [ hl.transforms.Prune('Constant') ] # Removes Constant nodes from graph.

graph = hl.build_graph(cnn, x, transforms=transforms)
graph.theme = hl.graph.THEMES['blue'].copy()
graph

그래프를 .png 파일로 저장할 수 있다.
graph.save('cnn_hiddenlayer', format='png')
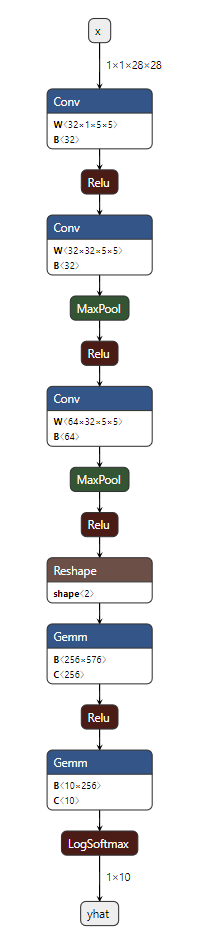
2-3) Netron
앞에 소개한 모듈을 통한 모델의 그래프화 외에 모델의 더 많은 정보를 포함해 그래프를 그릴 수 있는 방법이 있다.
- 파일 형태로 저장한 모델을 이용하여 시각화
- pytorch에서 만든 model을 onnx 형태로 저장하고, 저장한 파일을 시각화하는 방식
- 전체 그래프를 저장하는 onnx 파일을 이용
- netron을 이용하기 위하여 아래 링크에서 각 OS 환경에 맞게 설치 파일을 받아 설치https://github.com/gaussian37/netron
- pytorch로 만든 model을 onnx 파일 형태로 저장
import torch.onnx input_names = ['x'] output_names = ['yhat'] torch.onnx.export(cnn, x, 'cnn.onnx', input_names=input_names, output_names=output_names) - 저장된 cnn.onnx 파일 Netron으로 열기
- view > show attributes로 kernel size, stride, pad 등 확인 가능

* resnet101 netron 예시
# 출처 : https://gaussian37.github.io/dl-pytorch-observe/
import torch
import torchvision
import torch.onnx

model = torchvision.models.resnet101(pretrained=False)
params = model.state_dict()
dummy_data = torch.empty(1, 3, 224, 224, dtype = torch.float32)
torch.onnx.export(model, dummy_data, "output.onnx")
728x90
반응형
'AI > Self-Study' 카테고리의 다른 글
| PyTorch 모델 구조 summary & 그래프화 1 (0) | 2021.06.08 |
|---|---|
| Detectron2 Validation 사용하기 + loss 그래프 그리기 (0) | 2021.05.26 |
| yolov5 학습 튜토리얼 2 (+ mAP, IoU 설명 / Test 와 Inference) (3) | 2021.05.12 |
| yolov5 학습 튜토리얼 1 (6) | 2021.05.11 |
| 한줄로 Train/Test/Validation 나누기 (splitfolders : annotation도 함께 나누는법) (0) | 2021.05.11 |